How to Remove Artexing Safely A Complete UK Guide
How to Remove Artexing Safely A Complete UK Guide
So, you're looking at that textured ceiling and thinking it's time for a change. You've got a few ways to tackle it: you could wet it and scrape it off, plaster over it for a smooth finish, or even board over the whole thing. But before you get ahead of yourself, there's a huge, non-negotiable first step: finding out if it contains asbestos. This single fact changes everything about the job.
What Is Artex, and Why Should I Be Concerned?
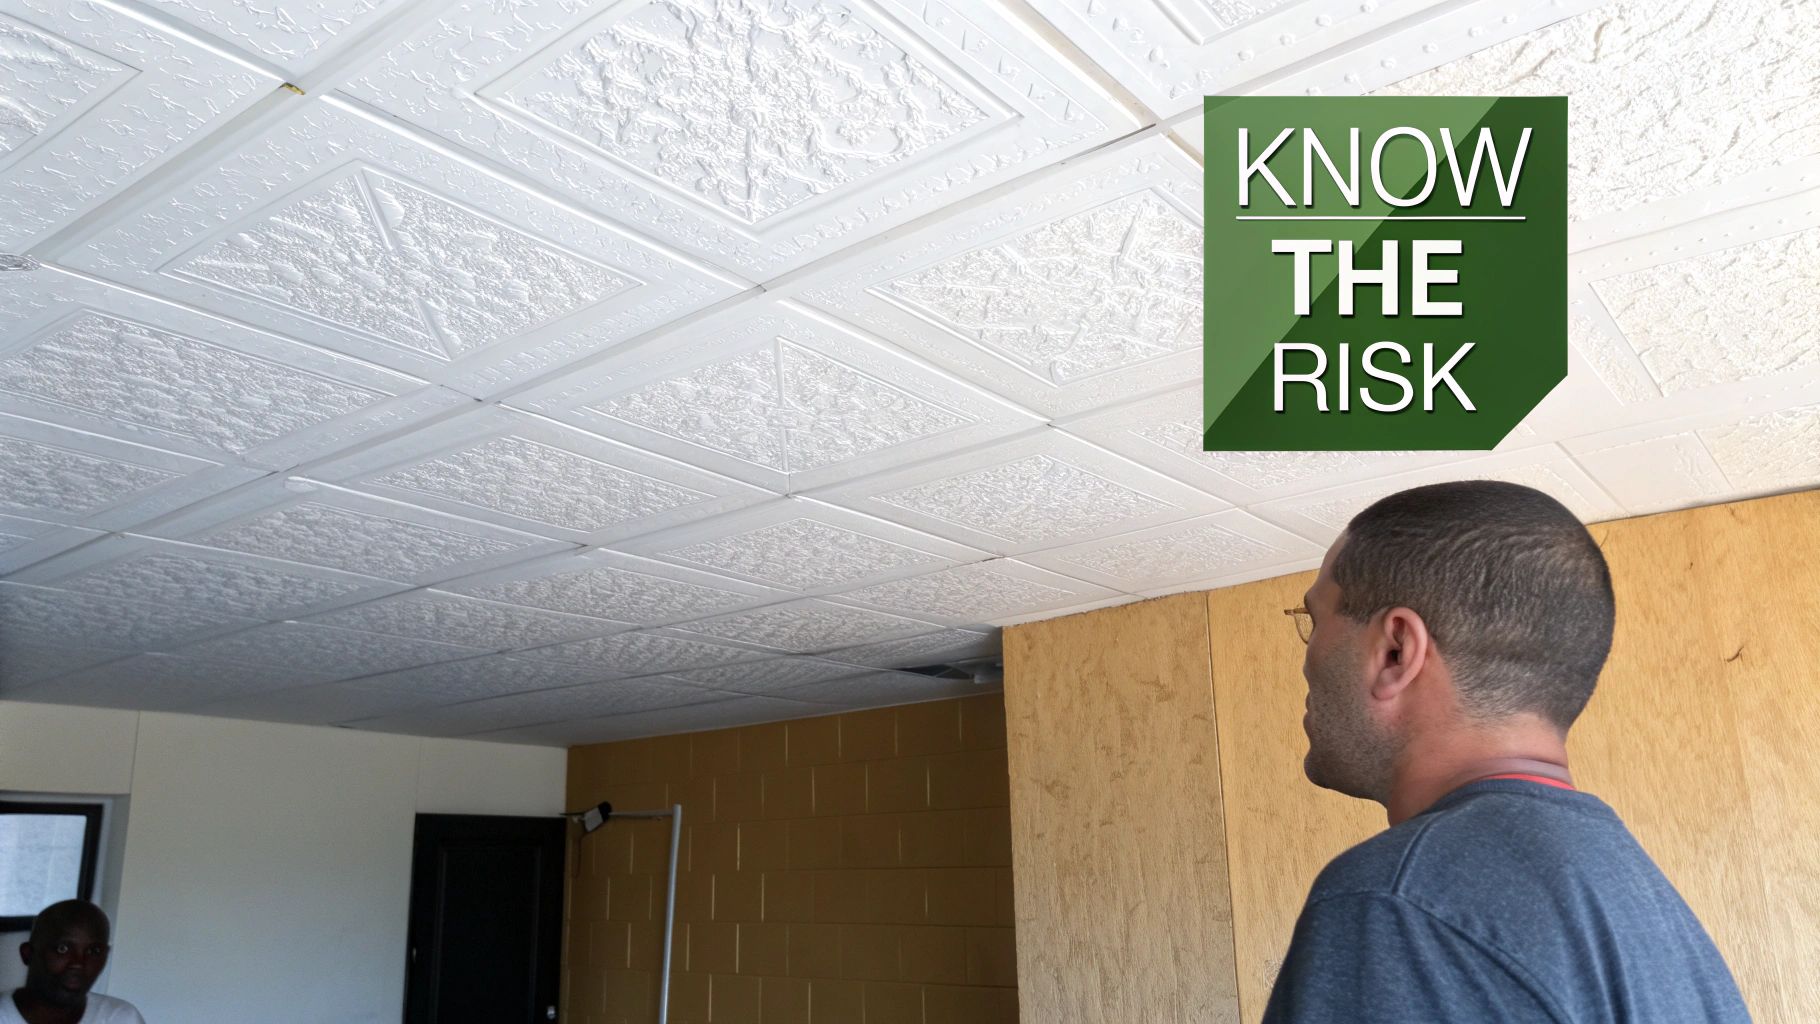
If you live in a UK home that was built or had work done before the year 2000, that swirly or stippled ceiling is more than just a throwback design choice—it could be a real health risk. Artex is actually a brand name that became synonymous with these textured coatings, hugely popular from the 1960s onwards. It was a brilliant way for builders to hide dodgy plasterwork and add a decorative finish all in one go.
The problem isn't the texture itself. It's what they used to mix into it. To make the product stronger and more fire-resistant, manufacturers often added chrysotile, also known as 'white asbestos'. For many years, this was just standard practice.
The Hidden Danger in Your Home
As long as it's left alone and in good condition, asbestos-containing Artex is generally considered low-risk. The tiny, harmful fibres are locked tight within the material. The real trouble starts the second you disturb it.
Any activity that breaks the surface—think drilling a hole for a light fitting, sanding it down, or scraping it off—can release those invisible fibres into the air. Once airborne, they can be easily inhaled, and that’s where the serious health problems begin. This is exactly why knowing how to remove artexing the right way is so critical. It’s not just another weekend DIY project.
The UK is dealing with a massive asbestos legacy. It's estimated that around 1.5 million buildings still contain these materials. The ban on all types of asbestos only came into force in 1999, but there was no requirement to rip it out of existing properties. Learn more about the UK's asbestos legacy at The Waste Group.
Why a Safety-First Approach Is Non-Negotiable
This guide is built from the ground up on one principle: safety first. Before you even dream of touching that ceiling with a scraper, you absolutely must find out if asbestos is present. That one piece of information will determine every single step you take from here on out.
The age of your property is your biggest clue:
- Homes built before 2000: You have to assume asbestos is present until you have a professional test that proves it isn't. The probability is just too high to take a chance.
- Homes built after 2000: It's very unlikely to contain asbestos. However, there's always a tiny chance that old stock was used during construction, so caution is still wise.
Trying to remove asbestos-containing materials (ACMs) yourself without proper training and gear is not only incredibly dangerous but can also be illegal. Exposure can lead to fatal lung diseases like mesothelioma and asbestosis, which often don't show symptoms for decades. Getting it tested by a professional isn't just a suggestion—it's essential for protecting the health of you, your family, and anyone who sets foot in your home.
Confirming Asbestos: The Only Safe Way to Start
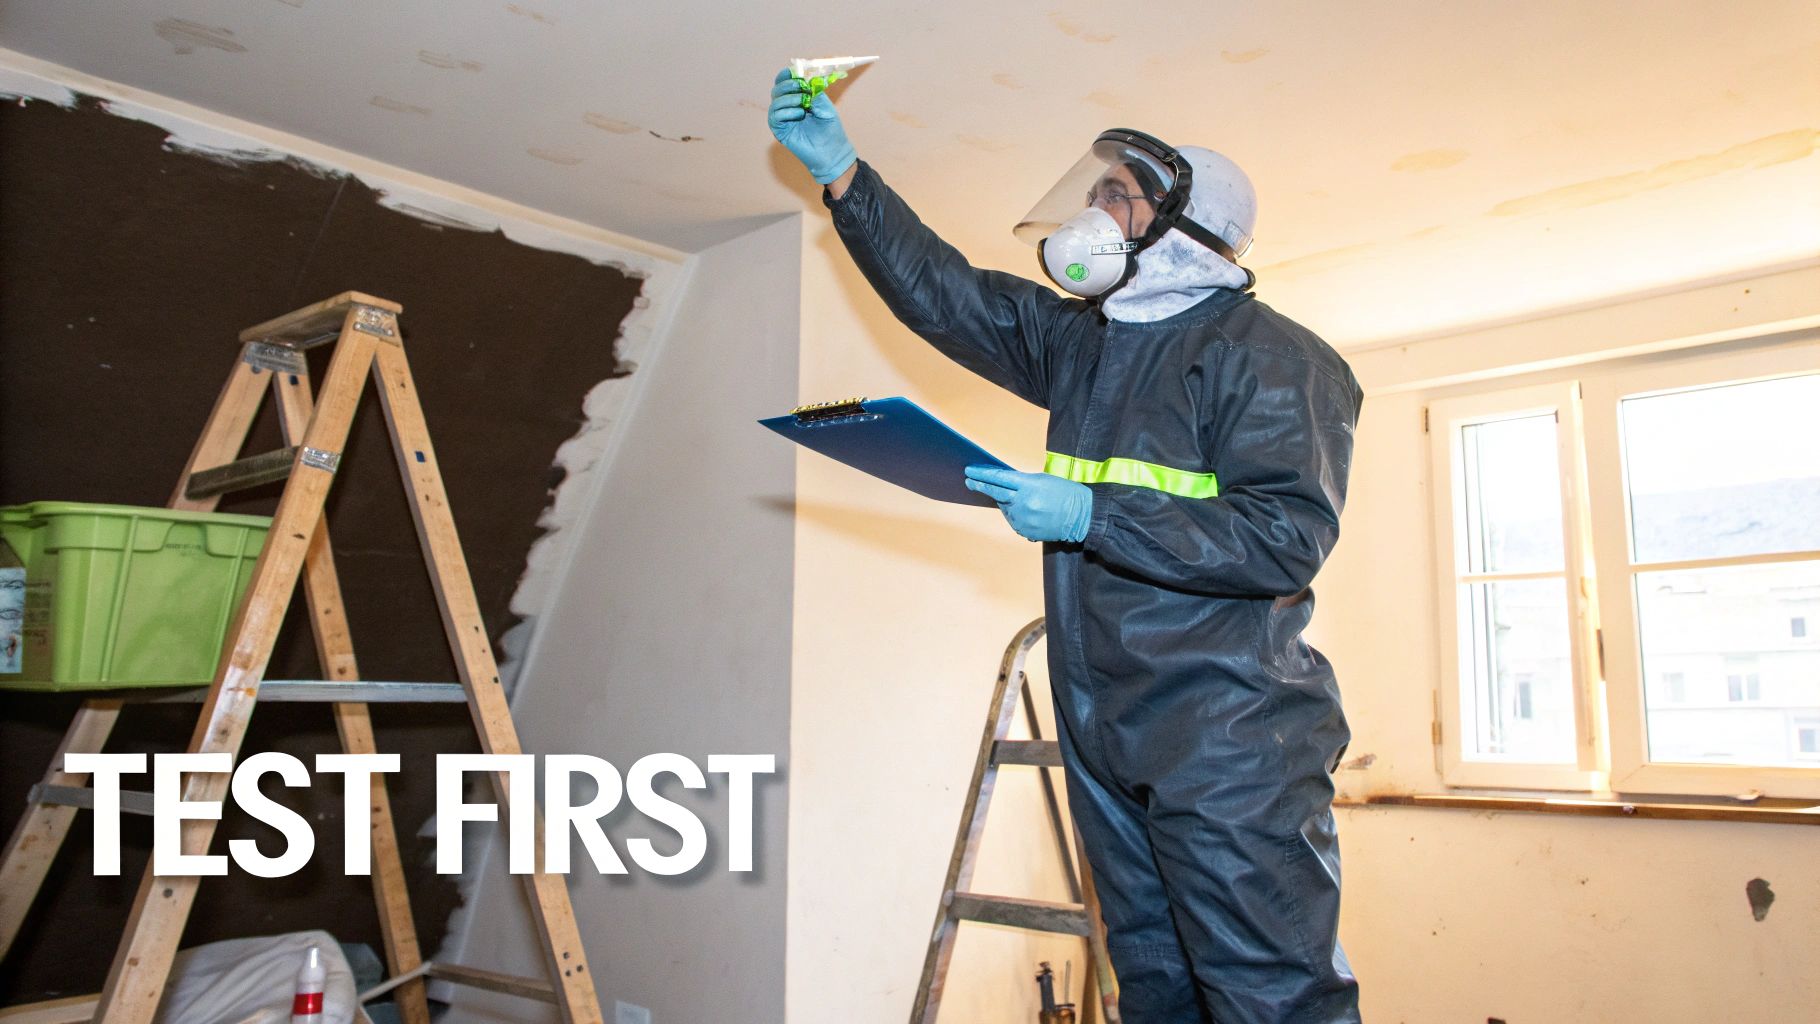
Before you even think about picking up a scraper, there's a crucial, non-negotiable first step: testing for asbestos. I can't stress this enough. Guesswork has absolutely no place here, as the presence of asbestos completely changes the game. It turns a potential DIY job into a task that legally requires licensed professionals.
Think of it like creating a risk register on a building site. You have to know exactly what hazards you're dealing with before you start. Without that confirmation, you risk exposing yourself and your family to dangerous fibres with serious, long-term health consequences. It's just not worth the gamble.
DIY Kits vs. Professional Surveys
You’ve probably seen DIY asbestos sampling kits for sale online. They might look like a cheap and easy shortcut, but they come with significant risks I've seen cause major problems.
The process itself requires you to break off a piece of the Artex – the very thing you need to avoid, as this is what releases harmful fibres into the air.
Plus, taking a single sample from one small spot isn't foolproof. Asbestos content isn't always evenly mixed throughout the entire ceiling. This means your sample could come back negative, giving you a false sense of security while a dangerous patch remains just a few feet away.
Professional surveys are the only truly reliable method. A certified surveyor knows exactly where and how to take multiple samples safely, minimising any fibre release. Their analysis is done in a UKAS-accredited laboratory, giving you a definitive and legally sound result.
What to Expect from a Professional Survey
Hiring a qualified asbestos surveyor isn't just about accuracy; it's about peace of mind. The process is straightforward and designed to keep everyone safe.
- Finding the Right Person: Your first port of call is to look for a surveyor or company holding UKAS (United Kingdom Accreditation Service) accreditation. This is your guarantee that they meet the highest industry standards for competence and impartiality.
- The Site Visit: The surveyor will visit your home, assess the Artex, and carefully take a few small samples. They follow strict safety protocols to contain any potential dust during this process.
- The Report: You'll receive a detailed report that clearly states whether asbestos is present. If it is, the report will specify the type (most commonly chrysotile, or 'white asbestos,' in Artex) and its current condition.
This report is your roadmap. It tells you precisely what you're up against, allowing you to make an informed and safe decision on how to move forward. If you want to learn more about identifying potential hazards, our guide on identifying asbestos in your home is a great resource.
DIY Asbestos Testing Kits vs Professional Asbestos Surveys
When you see the options side-by-side, the choice becomes pretty clear. Trying to cut corners on this initial step is a gamble with your health that you should never take.
| Feature | DIY Testing Kit | Professional Survey |
|---|---|---|
| Safety Risk | High – you have to disturb the material yourself. | Low – carried out by a trained, protected professional. |
| Accuracy | Unreliable – one sample might not represent the whole area. | High – multiple samples are analysed in an accredited lab. |
| Legal Standing | None – not accepted by licensed removal firms or waste facilities. | Provides official documentation for contractors and disposal. |
| Peace of Mind | Limited – leaves a huge amount of room for doubt and error. | Complete – you get a definitive and trustworthy answer. |
A professional survey is a small investment that provides invaluable assurance. It ensures your project is handled safely and correctly right from the very beginning.
How to Prepare the Room for Artex Removal
So, you've got the all-clear on asbestos. Fantastic news. Now comes the messy part, and this is where a lot of people trip up. It's incredibly easy to underestimate just how much dust and gunk removing Artex creates. Proper prep isn't just about making the cleanup less of a headache; it's about stopping a fine layer of dust from coating every single thing you own.
Your main job here is to create a completely sealed, self-contained work area. Think of it like building a temporary "room within a room". This step is absolutely critical. Skip it, and you'll be finding dust in carpets and cupboards for weeks to come. Trust me, don't cut corners here—you’ll live to regret it.
Creating a Sealed Work Zone
First things first, the room needs to be totally empty. And I mean everything—furniture, rugs, curtains, the lot. If you can, take down the light fittings too. Anything that absolutely cannot be moved, like a big radiator, needs to be wrapped meticulously in heavy-duty plastic sheeting and taped up tight.
With the room bare, it's time for containment. You have to stop dust from escaping and migrating through the rest of your house.
- Seal the Doorways: Grab some thick plastic sheeting (at least 1000 gauge is what you want) and use it to cover any doorways. Tape it securely along the top and sides of the doorframe. If you need to get in and out, you can create a simple flap with a second overlapping sheet, or even install a self-adhesive zip for a proper seal.
- Cover the Floors: Even if you're ripping up the flooring later, cover the entire thing with plastic sheeting. Make sure you overlap the edges by at least a foot and tape all the seams down to form a waterproof barrier. This is a non-negotiable step if you're using the wet scraping method, as it will prevent any water from causing damage.
- Protect Vents and Sockets: Head to the consumer unit and switch off the power to the room. Once that's done, use tape to seal over every electrical socket, light switch, and any air vents. The last thing you want is dust getting into your wiring or your home's ventilation system.
Crucial Tip: Before you start any work, turn off your central heating or air conditioning system completely. An active HVAC system is the perfect delivery service for dust, pulling it from the sealed room and distributing it beautifully throughout your entire property.
Assembling Your Personal Protective Equipment
Even without asbestos in the mix, the dust from old Artex is nasty stuff to breathe in. The fine particles can cause some serious respiratory irritation. Protecting yourself is not optional, and your PPE is your first line of defence.
Here’s what your essential safety kit should contain:
- Respiratory Protection: A basic paper dust mask won't cut it here. You need a proper respirator with an FFP3 rating. This is the highest level of filtration and is designed to block those very fine dust particles.
- Eye Protection: Get yourself some wrap-around safety goggles. When you're working overhead, the risk of dust and debris falling into your eyes is significant.
- Full Body Coverage: Disposable coveralls with a hood are a brilliant investment. They keep the dust off your clothes and skin, and when you’re done for the day, you can just peel them off and bag them up without tracking dust through the rest of the house.
- Gloves and Footwear: A good pair of heavy-duty gloves will save your hands from blisters and scrapes. Steel-toed boots are also a very sensible idea to protect your feet from any dropped tools or equipment.
Taking the time to do all this prep work might feel like a drag, but it's what separates a professional-looking job from a chaotic, dust-filled nightmare. This careful setup ensures that when the Artex is finally gone, all you're left with is a smooth, clean surface—not a house-wide cleaning marathon.
Choosing Your Method for Dealing with Artex Ceilings
Right, the room is prepped and you’ve got that all-important negative test result back. Now for the main event: deciding how you’re going to get rid of that textured ceiling once and for all.
There isn't a single 'right' way to tackle Artex. The best choice for you really boils down to your budget, how confident you are with DIY, and the kind of finish you're after. We’ll walk through the three most common approaches: wet scraping, skimming over, and boarding over. Each has its own pros and cons, so let's get into the details so you can make the right call.
This decision tree shows you exactly why getting that test done first is non-negotiable. A negative result is your green light to start planning your project. A positive result means you stop immediately and bring in the professionals.
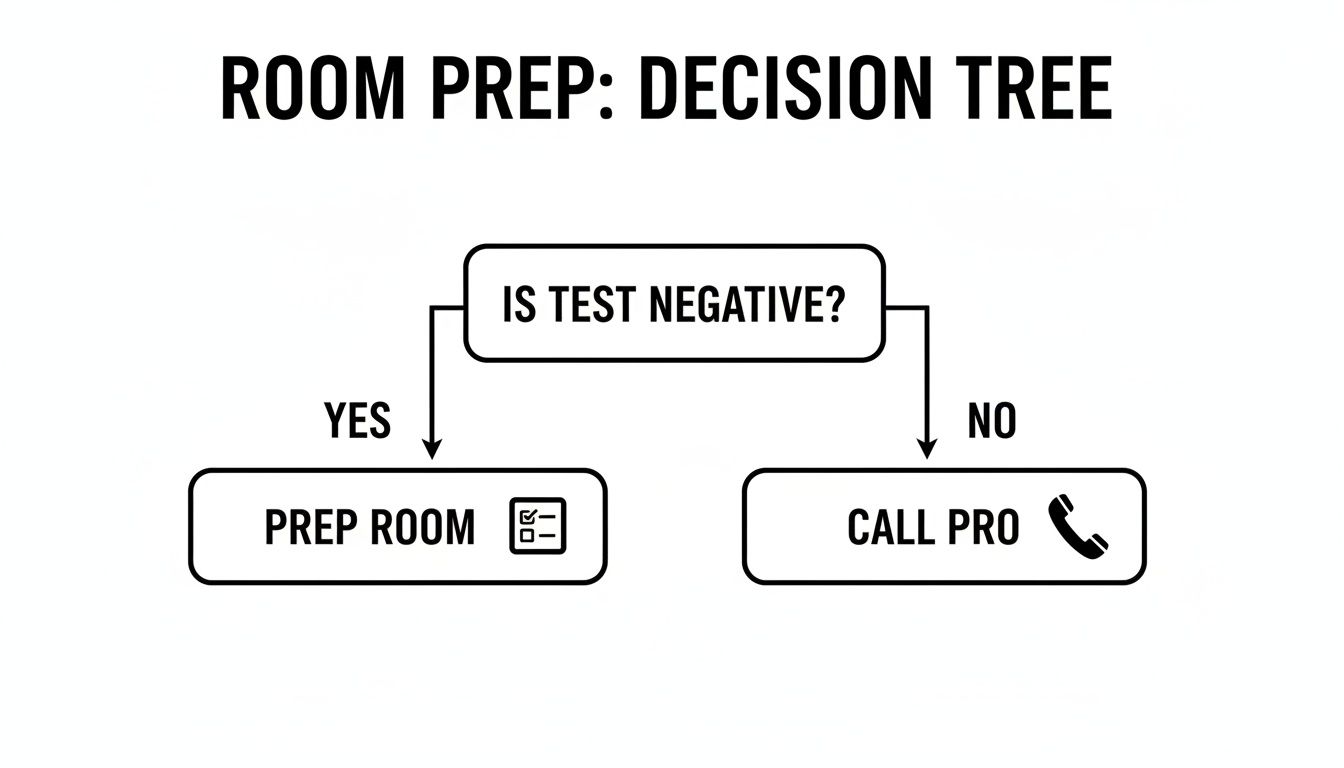
As you can see, everything hinges on that asbestos test. It’s the one thing that determines whether a DIY job is even on the table.
Method 1: Wet Scraping for Complete Removal
If your goal is to have the Artex completely gone, wet scraping is your most direct route. The idea is simple: you soften the texture with water or steam, which then allows you to scrape it off the surface underneath. It’s absolutely vital to remember this should only ever be attempted on non-asbestos Artex, and always while it's wet to keep dust to a minimum.
The whole process feels a lot like stripping old, stubborn wallpaper. A simple garden sprayer with warm water will do the job, but a wallpaper steamer is even better, especially if the Artex has been painted over multiple times. The steam is fantastic at getting through those layers of paint.
Once a section is good and soaked (give it a solid 15-20 minutes to soften up), you can start working it off with a long-handled scraper. The trick is to keep the blade at a low angle so you don’t gouge the plasterboard underneath. Be warned, it's a messy, physically demanding job, but it’s easily the cheapest option if you're prepared to put the hours in.
Pro Tip: Squeeze a bit of washing-up liquid into your water sprayer. It makes the water 'stick' to the ceiling a bit longer, giving it more time to soak in and making the scraping a whole lot easier.
Method 2: Skimming Over for a Flawless Finish
If the thought of spending hours with aching arms scraping a ceiling doesn't appeal, then skimming is an excellent alternative. This method essentially involves covering up the old texture with a fresh, thin coat of plaster. You end up with a brand new, perfectly smooth surface that’s ready for a lick of paint.
A lot of people go for this option because it avoids the incredible mess that scraping creates. The catch? It takes real skill. If you haven't plastered before, getting that glass-smooth finish is tougher than it looks. A badly skimmed ceiling can honestly look worse than the Artex you started with.
To prep the surface, you'll need to knock off any really high, pointy bits of the texture first. Then, you'll paint on a bonding agent, like a PVA glue mix, to help the new plaster stick. After that, it’s usually two thin coats of finishing plaster, trowelled smooth. For most people, this is a job best left to a professional plasterer who can knock out a room in a day.
Method 3: Boarding Over for Total Encapsulation
The third, and most belt-and-braces, option is to cover the entire ceiling with new plasterboard. This is the ultimate "out of sight, out of mind" fix. It hides the Artex completely and gives you a perfectly flat, solid new surface to work with.
This method is a particularly smart move in a few situations:
- If the original ceiling is in bad shape, with cracks and other damage.
- If you’re planning on fitting new lights, like downlighters, as it makes running the cables much easier.
- When you just want the most durable, long-lasting flat finish without any risk of the old texture ever showing through.
The job involves fixing new plasterboard sheets directly over the Artex, screwing them firmly into the ceiling joists above. The gaps between the boards are then filled and taped (a process called 'taping and jointing'), or the whole thing is skimmed with a thin layer of plaster for a seamless look.
While it’s usually the most expensive and disruptive choice, boarding over gives you a brand-new ceiling. It cuts down on the mess compared to scraping and offers total peace of mind.
Comparing Your Options at a Glance
Choosing what to do really comes down to balancing the cost, the effort involved, and the result you want. Here’s a quick breakdown to help you decide.
| Feature | Wet Scraping | Skimming Over | Boarding Over |
|---|---|---|---|
| Cost | Low (if DIY) | Medium | High |
| Effort / Mess | Very High | Medium | Low |
| DIY Friendliness | Moderate | Low (requires skill) | Moderate |
| Final Result | Good (can have imperfections) | Excellent | Excellent |
| Best For | Budget-conscious DIYers with plenty of time and patience. | Achieving a perfect finish without the mess of scraping. | Covering poor-quality ceilings or for major renovations. |
Ultimately, there isn't one answer for how to remove artexing. By weighing up these three core methods, you can make a properly informed choice that fits your home, your skills, and your budget.
Safe Disposal and Navigating UK Waste Laws
Getting the Artex off your ceiling is a huge achievement, but the job isn’t quite done. What you do next with the bagged-up waste is just as important as the removal itself, and it’s an area governed by some pretty strict UK environmental laws. This isn’t just about having a final tidy-up; it's about public safety and staying on the right side of the law.
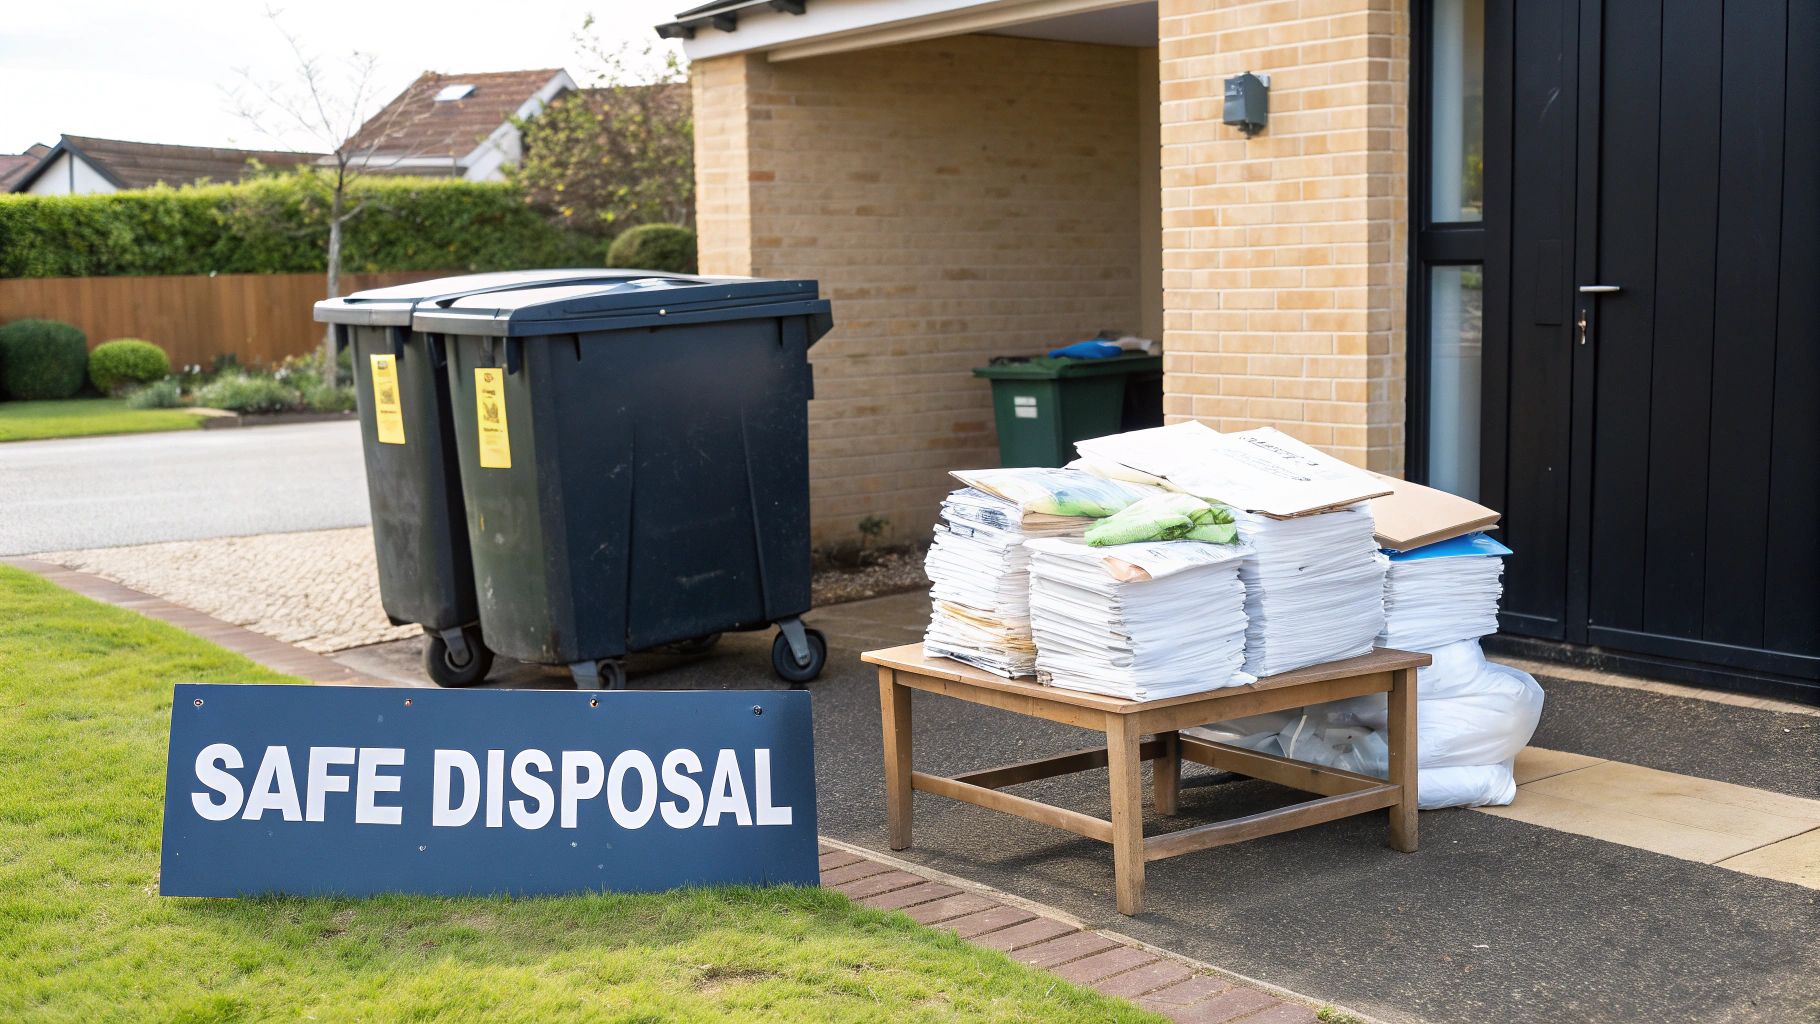
Even if you’ve had the all-clear and your Artex is non-asbestos, it’s still considered construction waste. That means you absolutely cannot just chuck it in your regular household wheelie bin. It has to be taken to a licensed local authority recycling centre that’s equipped to handle this type of material.
The game changes completely if your Artex contains asbestos. This waste is officially classified as hazardous, and the regulations for handling and disposing of it are incredibly tight. Getting this wrong can lead to serious fines and, more importantly, puts anyone who might come into contact with it at severe risk.
The Rules for Asbestos Waste
The second your Artex is confirmed as an asbestos-containing material (ACM), a whole specific set of legal protocols from the Control of Asbestos Regulations 2012 comes into play. These rules are there for one reason: to stop any dangerous fibres from escaping into the environment.
This is why getting the containment and disposal process right is non-negotiable. The rules are crystal clear:
- Double-Bagging: All asbestos waste must be sealed inside a red inner bag that has clear asbestos warnings printed on it. This red bag then goes inside a second, clear outer bag, which also needs the correct warnings.
- Secure Transport: You can’t just pop these bags in your car boot. The waste must be transported by a carrier holding a specific hazardous waste licence.
- Authorised Disposal: Finally, the waste can only be taken to a landfill site that is licensed and equipped to safely bury fibrous asbestos materials.
The health consequences of getting this wrong are severe. UK data on asbestos-related diseases paints a tragic picture, with over half of all deaths from mesothelioma—a cancer directly caused by asbestos—occurring in people over 75. This reflects the long latency period of the disease and historical exposure in the trades, hammering home why preventing any modern-day exposure through correct disposal is so critical.
Professional Waste Management: The Only Safe Choice
Given all these complexities, managing asbestos waste disposal is absolutely not a DIY job. The legal and safety risks are just too significant. This is precisely where a professional waste management service becomes essential, making sure every single step is handled correctly and safely.
At The Waste Group, we provide fully compliant asbestos collection services designed to give you complete peace of mind. Our specialised, lockable skips ensure that the hazardous material is securely contained on-site before being handled and transported by our licensed experts.
Opting for a professional service takes all the guesswork and risk out of the equation. We manage the whole process, from providing the correct containment with our lockable skips to making sure the final disposal is documented with the necessary consignment note. For more details, you can read our guide on using a dedicated asbestos skip bin.
This professional oversight is your guarantee that you remain fully compliant with UK law, protecting both your family and the wider community from the dangers of asbestos. It’s the responsible final step in any Artex removal project that involves hazardous materials.
When to Call a Professional Asbestos Specialist

Let’s be crystal clear about this. If your asbestos survey results come back positive, everything changes. This is the exact moment your DIY project stops being a DIY project. Any thought of tackling it yourself needs to be put aside, immediately. The conversation is no longer about how to scrape a ceiling; it’s about protecting your health and staying on the right side of the law.
Handling asbestos-containing materials (ACMs) isn't a job for an enthusiastic homeowner or even a general builder. It’s hazardous work that, by law, demands a licensed asbestos removal contractor. These specialists have the specific training, insurance, and highly specialised gear needed to manage this dangerous material without putting you, your family, or your neighbours at risk.
It's a stark reminder that some home improvements are simply not worth the risk. For a bit more perspective on where to draw the line, it’s worth reading about other DIY jobs you shouldn't attempt yourself. This helps put into context why some tasks carry consequences far heavier than a wonky shelf.
Understanding the Costs of Professional Removal
One of the first questions homeowners ask is, understandably, about the cost. Professional asbestos removal is a significant investment, but it's an absolutely necessary one. The price isn’t just for the labour; it covers a meticulous safety process from start to finish.
Your final quote will hinge on a few key things:
- The size of the area: A small hallway ceiling will, of course, cost much less than stripping back multiple large rooms.
- Ease of access: Awkwardly shaped rooms or very high ceilings can add time and complexity to the job.
- The Artex's condition: Intact Artex is simpler and safer to deal with than material that is already damaged, crumbling, or flaking.
- Disposal fees: The cost of transporting and disposing of hazardous waste at a licensed facility is always factored in.
In the UK, the cost to remove asbestos Artex ceilings can vary widely. For a typical 10-20 square metre ceiling, you might see removal costs between £300 and £1,200. But that's not the whole story. You also have to account for comprehensive testing (from £150 to £500) to confirm the presence of asbestos before any work begins. Disposal fees add another £100 to £500, depending on how much waste needs to be transported.
All in, the total estimated cost for an average asbestos Artex ceiling removal usually lands somewhere between £1,250 and £6,000.
The Value You Get from Hiring an Expert
While the price tag is a major factor, you have to weigh it against the immense value and safety that a professional brings to the table. Paying a licensed contractor isn't just an expense; it’s an investment in your home’s safety and your family’s long-term health.
Hiring a professional is about more than just getting the job done. It's about risk elimination. You are paying for the guarantee that every single dangerous fibre will be safely contained, removed, and disposed of according to strict legal standards.
Here’s exactly what that investment gets you:
- Guaranteed Safety: Professionals build a fully sealed, negative-pressure enclosure to work inside. This sophisticated setup ensures no asbestos fibres can escape into the rest of your home.
- Legal Compliance: They handle all the necessary paperwork, including the hazardous waste consignment note, which is your proof that the material was disposed of legally. This protects you from any future liability.
- Efficiency and Expertise: A licensed team can often get the removal done in a day or two, minimising disruption. They know the best methods to remove the Artex with the least amount of damage to the surface underneath.
- A Perfect Finish: Once the removal is complete, they carry out a thorough decontamination of the entire area. Many can also arrange for a plasterer to come in right after, leaving you with a perfectly smooth, clean, and safe ceiling, ready for a fresh coat of paint.
When you're ready to find a qualified local team, searching for "asbestos removal near me" is a good starting point to find licensed professionals in your area. Ultimately, once asbestos is confirmed, calling in a specialist is the only responsible choice. It’s the clear line in the sand between a simple decorating task and a serious health hazard.
At The Waste Group, we specialise in the safe and compliant disposal of hazardous materials like asbestos. If your contractor needs a reliable partner for waste management, our licensed collection services and secure skips ensure the final step of your project is handled with the utmost care. Get in touch with us at https://www.thewastegroup.co.uk to discuss what you need.